

Value Drawing - exercises and tips
VALUE DRAWING IDEAS & TIPS ( Value means tone, or how dark or light something is)- Copy this tonal strip below (use at least 6B or 8B for the darker tones, even charcoal for the darkest.)
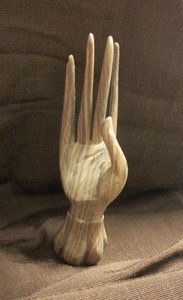
TONAL EXERCISE 1. Make a light line drawing of this 3d object, or find an interesting object, from around the home, and shade it tonally using your 2B, 6B and eraser.
Start with a light line drawing (see below)
• Shade in a dark background as you see in the photo, quite dark in parts
• Give a light shade all over the hand, use your eraser to pull out the highlights, then shade a little darker in the right areas on the hand (or your object). Note that the wooden sculpture of a hand has an inherent texture/grain as well as the effects of light and shade.
• Repeat this exercise using the photo upsidedown
& ‘seeing’ just abstract shapes of different
tones/values. It is good to try all methods of
seeing and drawing to find which works best for you.
(use a separate page and keep it together in your notes

VALUE DRAWING IDEAS / TIPS – set up a dramatic side lighting on an object with an appealing or interesting 3D shape – I set up a wooden hand sculpture with a dark cloth behind , but you could choose a range of your favourite things to practice with. a) Start with a simple line drawing in HB
b) Shade, following the light & shade shapes that you see (lines are 'implied', made more with the contrast between tones, don't leave the actual drawn lines showing as well.) I started shading the dark background first, using a spare piece of paper to cover already worked areas as I moved around. (helps to stop your hand from smudging the graphite all around)
c) I was using artistic license to omit the striations in the wood of the sculpture and I also took a few liberties with the fingers, making them a little shorter ( you donʼt have to be doing this to start off, just finding a simple 3D object and being happy with your representation of it will be very satisfying at first. )
NB:- I used a 2B for preliminary hatching and blending, moving onto a 5B to darken background shadows even more - I used a paper stump for blending as I went along - I used a Derwent eraser to slice back some highlights (you can also use a Stanley knife to get a sharp edge on a regular gum eraser) Use this space(or a page in your visual diary) to do a value drawing of a simple 3 D object in a nice light. (maybe a figurine, a toy or sculpture) Use extra pages and store in a folder with your notes fropm here. This can be your visual journal.


TONAL EXERCISE 2. Create a tonal ground in a rectangle of similar proportions (shade it all one tone, about a 3 - 4 on the tonal scale above, turn the page upside-down, then draw an outline of this subject, then erase for highlights and darken deep values to build a 3D value (tonal) drawing, blending with your paper stump. (on another page try him again with a cross-hatching approach.) ‘See’ just tonal shapes, don’t think ‘nose, eyes, hair, beret’. Use a kneadable eraser for soft lift outs, a gum eraser edge for details. (or a battery-operated eraser if you have one)
• Always, before you begin shading, check that the objects, spaces(especially the negative spaces), and perspective elements are drawn correctly. Check the relationships of objects to one another, observe that the angles, landmarks, sizes, and proportions are accurate, and adjust as may be needed first. Try to see all shapes as abstract tonal blobs.
• Use Squinting, to see the different values of objects, it provides you with a visual 'map' for sketching the shape of each value and the relationships.
• You need a basic minimum of 3 values to get a decent 3D look for your object. With this one, you could easily use 5 tones (values) or more.
Follow along the sections of the Foundation Drawing Module index, by clicking on each image in the grid
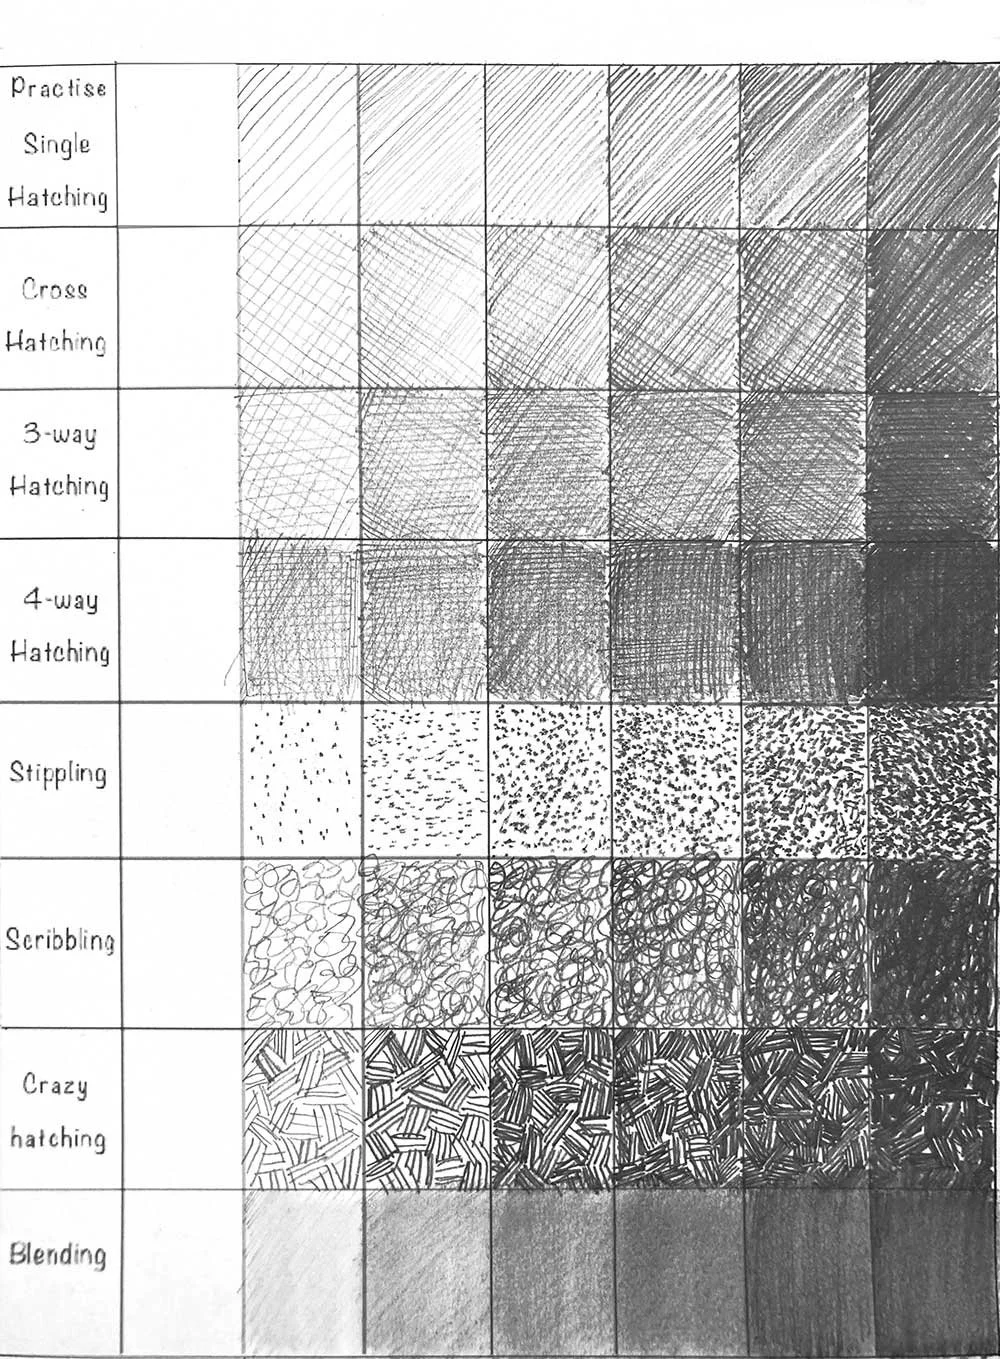
Hatching and Blending Practise

Elements of Drawing

Contour Drawing

Value Drawing

Drawing Shadows

Gesture Drawing

Human Proportions

Improving visual perception

Introduction to Drawing animals

Cross-hatching exercises

Introduction to Drawing People

Drawing the landscape