

Drawing Portraits & People
General Drawing Tips and hacks (there is a full Figure Drawing Module, once you have conquered all exercises in this General module)
1) Always add some shading to the whites of people’s or animals’ eyes. (and then remove any reflected light with your sharpest-edged eraser). A favourite is the Derwent battery-operated, but slicing a sharp edge off a gum eraser can be somewhat effective for tiny eraser jobs. (your kneadable eraser is good for smoothly ‘blotting’ tone off in cheeks etc.)
2) In a graphite or charcoal portrait, use tones to imply the colour of the iris of an eye, and by using different values you can show that brown eyes are very dark in value, almost as dark as the pupil. Hazel, mid-blue, or green eyes are mostly shaded with middle values. Pale blue, green, or grey eyes are very light in value and contrast sharply with the dark pupil.
r] The eye on the right is not super refined yet, but it shows the following features
* direct and reflected light on the iris, pupil and sclera, cast shadow from lashes, form shadow of the eyeball (sclera)
* The lower inner lid is clearly shown (you can leave this out, shading around it, or you can use a battery-operated eraser to gently make the light curved line ).
* top & bottom lashes vary in length and thickness
* The tonal hatching/shading implies iris muscle and also implies a light-coloured eye.
* NB. the iris is a tad super-sized, this is a personal thing, not all artists exaggerate eyes (I started drawing eyes as a little child and they were the most important thing at the time, other than horses, hence this habit developed). Even my friend below who is of Asian descent got the big-eye treatment. (not on purpose, he has a certain way of drawing eyes that he has been doing since childhood too, comic style features). If you spend your youth repeatedly drawing a certain way, it can stick!
3) The secret to drawing teeth well, is to draw everything around them instead! Allow the shading of the lips, the upper and lower gums, and the shadows created by the light source to define them. Teeth, which are further back in the jaw, need to be shaded darker than you may think because they are in the shadows of the mouth. Never draw lines between the individual teeth, or else they end up looking like a cheesy cartoon.
r) This is not the photo of my friend I used as a reference, I can't find it now. (but it illustrates well what I mean about teeth.)
4) Draw eyelashes from the lid up and out away from the eyelid. A light flicking stroke should enable you to get a curve and a very fine end. Practice a little first on scrap paper.
5) Soft lighting works best for portraits of young children. (minimal lines imply youth)
6) The eyes of babies and children are more rounded, the irises appear to be much larger, and their eyebrows are much lighter and finer than those of adults.
7) Babies’ heads are proportionately large when compared to their tiny bodies, but their faces are disproportionately tiny. The most common mistake of beginners, attempting to draw a baby’s portrait is to make the face too big, in proportion to the size of the skull.
8) Resist the temptation to make a baby’s hair too thick or full. When it comes to babies' hair, “less is more”.


9) To show progressing age in older subjects, the changing three-dimensional marks left by soft tissues need to be shown, by transforming the outward appearance of the skin, fat, and muscles (pulled downward by gravity). Adding more lines to a subject’s face is not always that successful! (even though leaving outlines on a baby can help them appear baby-like.)
10) The various parts of the eyes look very different when you view them from different angles. People’s eyes also change shape with different facial expressions. Repeated observation ++++ and practice++++ is the key to getting these important features and expressions looking how you want. (which will help you get a ‘LIKENESS’ as well.)
11) When drawing eyes, you need to draw the forms (Bony and soft tissue) of the face (shading them and highlighting them accordingly), and the various folds of skin around the eyes.

12) Whenever you draw eyes as a feature, keep the initial sketch lines very light so they can be erased later. Instead of lines, use contrasting shading gradations to separate the various parts of the eye, and give depth to their forms.
L] This little boy's eyes are actually light to mid-green, but given the relative tones in the rest of the composition and the lighting, they are shown with a tone darker than you would expect.
13) When selecting a pose for a portrait, something as simple as the tilt of a head, can make your drawing more interesting, and even tell something about the personality of your model. Front-on poses are good for learning, but once you are confident with the proportions etc, a ¾ pose is the next one to try to master, after that the sky is the limit.

FIGURE DRAWING FROM LIFE –(always set up a strong interesting light source)
1) a- Identifying the exterior three‐dimensional forms of adult bodies, as defined by the shapes of bones, fat, and muscles, is more important to artists than memorizing the Latin names of different parts of the body. It is great if you come from a health field background and already studied anatomy in detail, but if not just concentrate on learning what makes the curves, lumps and bumps on your subject. (before you visit a live model sitting or get a friend to patiently sit for you). Drawing from marble and bronze sculptures is good practice as well, they don't intimidate newbies as much!)
1) b- Get an Anatomy for Artists book,(I like Sarah Simblet's by that name, published by DK.) Concentrate on getting a handle on these male/female bodily features rather than trying to develop a forensic scientist's knowledge of Latin.
1) c- Download some anatomical guides to help you with basic measurements and proportions.
2) If you get a model, look after them with food and drink and comfort, and choose poses that are expressive, artistically pleasing, and comfortable for your model.
3) Use tape or chalk to mark the placement of a model’s body on the surface on which he or she is sitting, standing, or lying. For example, by marking the outline of the model’s feet in a standing pose, he or she can easily find the correct pose again after a break.(it is hard to maintain one pose for long). I once modelled for the bronze cast of a female historical figure for a museum, it was agony, especially on the feet (8 hours!!!). My little sister modelled for me when I was a teenager and she used to get twitching eyes from sitting too long! My mother always told me off for making her suffer for my art!)
4) Experiment with different drawing media such as conté (chalk pastel), charcoal, or graphite sticks and use large sheets of paper when sketching figures.
5) Don’t worry if your drawings of faces, bodies, esp. hands and feet look all wrong at first. Just do your best TO NIT PICK angles, proportions and shape one by one and in time with constant practice and review of proportions and anatomy (step by step) plus rendering techniques, and you will get better!
Understand that it does take time and a lot of hands-on practice, keep a little sketchbook in your bag with a few drawing tools and take any opportunity to draw. (now, if you are like a few of my students and are never realistically going to be able to take all of this drawing practice advice……. you could get very good at gridding!) Anyway, keep all of your drawings, good and bad, they will show you your progress later on. (my biggest regret is giving away almost everything that I did in my early formative years.)
EXERCISE IN DRAWING HANDS

On a separate piece of paper, draw a larger rectangle (do the maths and get the same proportions as this rectangle here). IE. Decide on a height for your rectangle in your sketchbook, get the 'factor' by dividing this rectangle here's length by its height, then multiply your height (in your sketch pad) by the same factor and you have the length of your new larger rectangle.
Use the same technique of shading a lighter-mid-tone overall first as you did earlier, and after you have the line drawing in, darken the darks and erase in the light-tone areas.
Next, draw it again freehand on another page or practice using negative spaces and/or gridding.
When you are confident in all aspects of the general drawing module, look for the Figure Drawing Module
Follow along the sections of the Foundation Drawing Module index, by clicking on each image in the grid
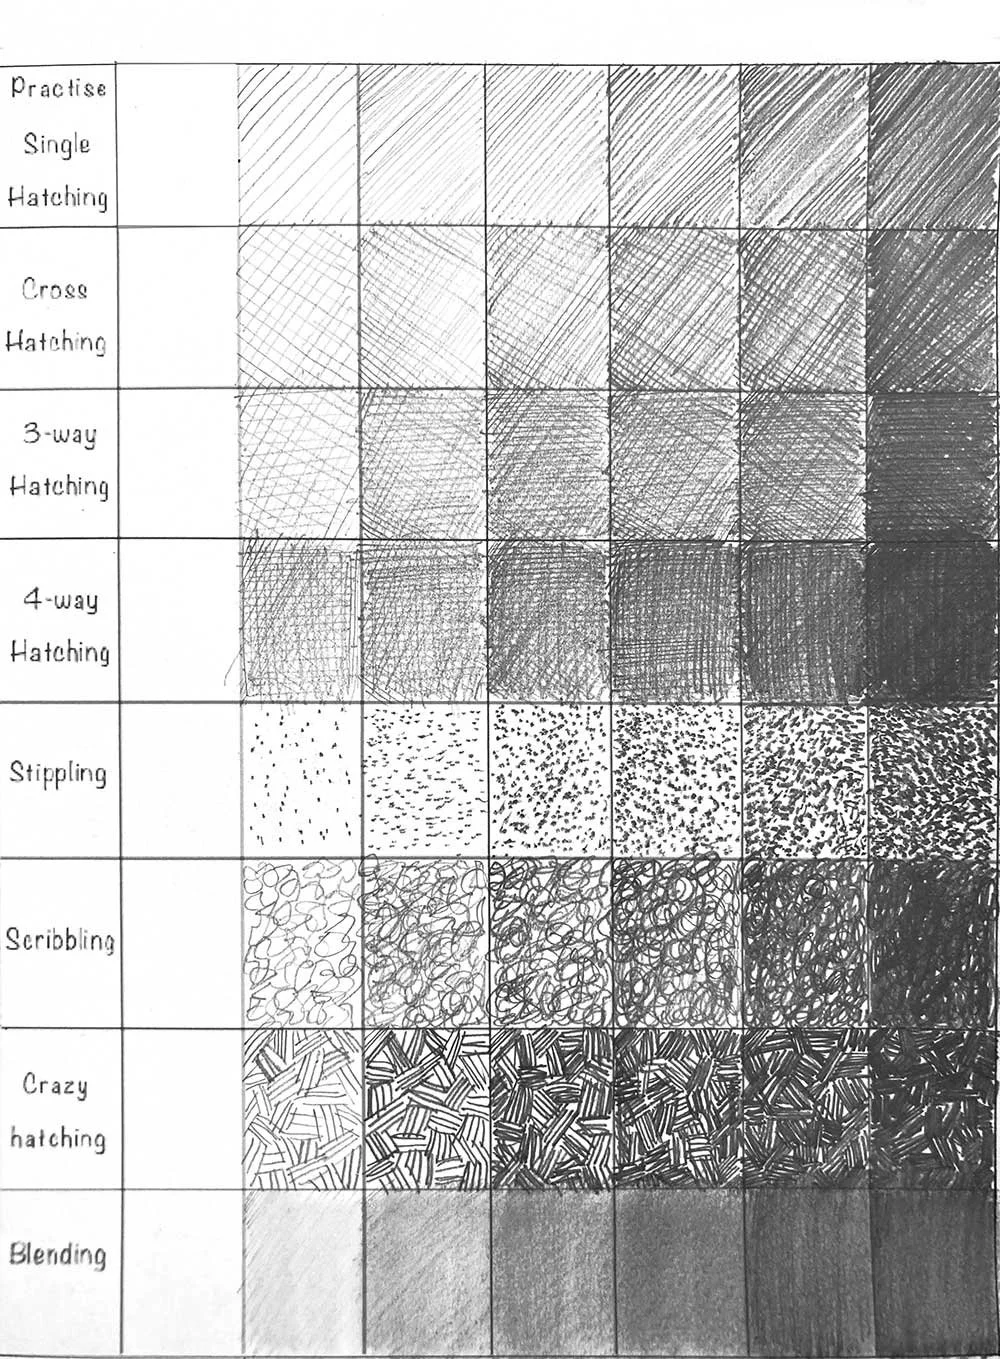
Hatching and Blending Practise

Elements of Drawing

Contour Drawing

Value Drawing

Drawing Shadows

Gesture Drawing

Human Proportions

Improving visual perception

Introduction to Drawing animals

Cross-hatching exercises

Introduction to Drawing People

Drawing the landscape