
Improving Perception
There are several approaches to trick your mind out of drawing what it thinks it 'knows' and into drawing what you really see. (read about each and then try them)
1) a) Draw the Negative Spaces (space around things rather than the actual things)
b) Use an ‘envelope’, use 6-12 landmarks to enclose the form inside a space, and then break down the little spaces between the subject and the envelope border. >>>Afterwards, refine the detail in each part of the subject
2) Measuring Relative Proportions - Use the 'thumb and pencil' method of measuring the relative lengths of whatever you are trying to draw.


3) Use a Grid (more detail below)
4) Draw Upside-Down (just look for tonal shapes first, not realistic detail, like in the previous Che Guevara exercise)
5) Use a small hand mirror to check the Mirror Image (errors are easier to see clearly)
6) When drawing an animal or person (especially), visually break the subject down into basic circle, oval, rectangle, and triangle shapes and measure proportions. Closely examine the areas where parts of the body bend, twist, or are extended or outstretched.
To 3D model, the forms, see the 2D shapes as spheres, cubes, and pyramids.
7) Only through repeated practice will observational skills improve and also the eye/hand coordination required to get a good likeness. Gridding is an alternative way to get a likeness. (Projectors and tracings can also be used but can cause students more headaches from what I have seen, especially using a projector when drawing fine details onto a canvas: a stretched canvas moves with every touch of the pencil, and you need to stabilize the drawing surface first.)
8) Place your drawings/paintings in a place where you will see them often and when something catches your eye (or seems not quite right), make a note and come back to it (also look at it in the mirror).
9) Don’t draw on a flat surface if you can tilt your paper a bit! When you draw on a flat surface, the top of your paper is further away from your eyes than the bottom. As a result, you can end up with some problems trying to draw accurate proportions. (Although if you are leaning right over your paper, this is less of an issue).
GRIDDING - (invented in the late 1400s by German artist, Albrecht Dürer).
Triangulation (image under that of a grid), involves further dividing the image with diagonal lines, which helps to not confuse the grid squares, since shapes appear as opposite to their neighbour, and don’t all look the same.
**Firstly, a grid is mostly useful for accurately transferring an image to your drawing or painting support (surface) but you need to have the proportions and composition/ arrangement of what you are gridding all planned out .eg. you may have a square reference material with a picture of a person but your support (paper or canvas) is rectangular and your composition includes the subject (from the square) plus other compositional features or background.
**Acetate or plastic sheet protectors can be fixed to the reference material and the grid drawn in with a fine liner so that the photo is not damaged (if not necessary just draw the grid on your image or a photocopy of it eg. right). Measure accurately in mm with a ruler. A small amount out can translate to an irritating error in this left-brain method.
**Measure carefully and mark the same number of squares in your grid for the image and the support (use more squares if there is more detail.) Use a watercolour pencil (on a light ground) or chalk /conte pencil (on a medium to dark ground) if on canvas or board, and very light HB graphite if on paper.
NB. You need to do a little maths to make sure you have the same proportions with rectangles. eg. Your photo reference is 10x15cm (15 divided by 10 = 1.5), and your canvas is 120x90cm (1.333) you are asking for errors if you grid from one to the other.
In this case, add to your photo (before giving it a grid) by sticking it to white paper and drawing on the extra length with a pencil (15 divided by 1.33 would be 11.28cm, so add on 1.28cm and your reference is now the same proportions as your canvas). Alternatively, you can divide 120(your canvas length) by 1.5 = 80cm, rule off 10cm on your canvas height and it will then have the same proportions as your photo. The catch is to make sure the end result will be a good overall composition as well. (see the module on Composition/Design)
To start using the grid to draw, chose major landmarks, map them in and gradually work back between them, remember that one little mistake translates into a totally inaccurate part or whole of your image. This technique doesn't really help that much to develop your observational drawing skills but if used carefully can allow you to move forward quickly with painting/ rendering and tonal modelling.
Some notes on WORKING FROM PHOTOS
1) Whenever you plan to do a drawing or painting from photographs, take lots of pictures of the potential drawing subjects from several different angles if it is at all possible. Your drawing skills will benefit if you are familiar with a subject from all sides, then you can more accurately draw its forms. Lighting (and its effects) is one very important aspect that can be missed in a photo or by working only from a photo.(See module on Value, Contrast, Light & Shade).
2) Downloading an image from the internet will mostly get very low resolution so good quality detail is almost impossible, especially with figures and lighting. It is sometimes better to get friends and family to sit for you while you are learning, at least for a good-quality photo with interesting lighting, unless you can get them to sit for the duration.
3) Have a basic set of drawing materials prepacked so you can spontaneously take your art practice outside whenever you want + take photos as a reference backup.


Follow along the sections of the Foundation Drawing Module index, by clicking on each image in the grid
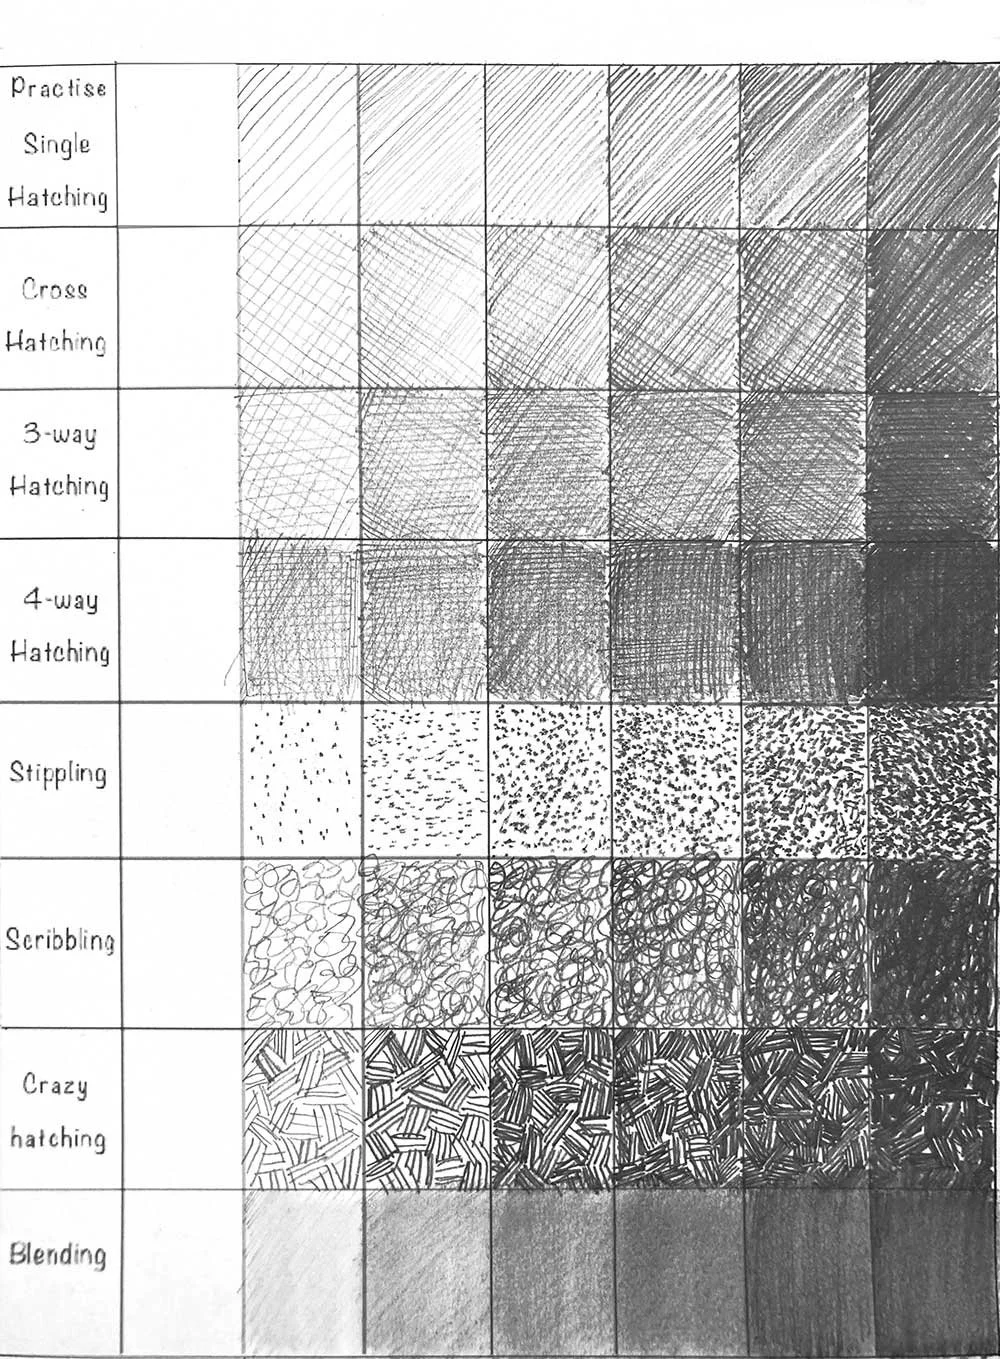
Hatching and Blending Practise

Elements of Drawing

Contour Drawing

Value Drawing

Drawing Shadows

Gesture Drawing

Human Proportions

Improving visual perception

Introduction to Drawing animals

Cross-hatching exercises

Introduction to Drawing People

Drawing the landscape