
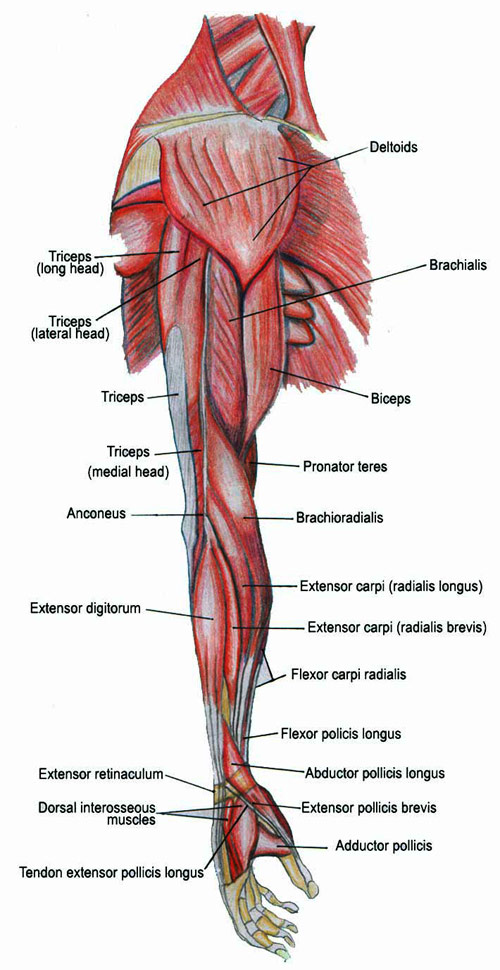
Using your anatomy reference book (if you dont have one yet, you are not yet very serious about drawing the figure), study closely the main muscle shapes of the arm. You can see the flexor and extensor groups and the shapes they make. Even if you use an online reference, or a borrowed book from the library you must really get a good look at what makes the external shapes look as they do.
http://commons.wikimedia.org/wiki/Category:Anatomy_of_the_human_arm

When you get to the arms during your fleshing out of stick figures, just try to define the main shapes and practise them until it gets easier. Try to learn where the major muscle groups are, hence the main shapes, landmarks and curves, and observe the difference between male, female, well toned/ flabby etc.
Illustrative and comic artists tend to break everything down into 3D geometric shapes and then refine them. I always preferred observing and knowing the major shapes, the defining landmarks that surround the stick figure structure and refining from there. I had ulterior motives for knowing each and every muscle by name (medical and sporting reasons) but I don’t really believe every artist needs to know the Latin term for every muscle, tendon or bone.
Each artist learns in their own way. The methods of a comic artist who needs to create multiple dynamic imaginary figures of superheroes will differ from a fine artist who paints the reclining nude or the occasional fully clothed incidental figures in a landscape


Now go through this process with various views of the arms
The best subject to practice because it is always in front of you!!
Check out the hand anatomy plate from Gray’s Anatomy of the Human Body
FRONT OF THE HAND
Observe the rectangle with a sloping top, note where the thumb and fingers exit from.
Note that none of the joints or finger-tips are in a straight line horizontally.
Note that from the front the fingers seem shorter than the palm length but from the back the fingers seem as long or longer and spaces between joints differ more obviously.

Now take a moment to look at the fleshy parts of the palm.
Each finger has three pads, even the thumb, although the bottom pad is that large fleshy part on the palm under the external part of the thumb.(thenar eminence)
Then there is the other fleshy part opposite it.(hypothenar eminence)
The last fleshy part is along the upper area of the palm before the fingers, have a look at these fleshy areas on your hand.
BACK OF THE HAND
Not as much fleshiness to study on the back of the hand, but the knuckles and nails and folds of the 'webbing' are worth studying well.

Try to practice drawing your hand in some of these positions. These are some free vector drawings I found, use your own hand in these positions, I am sure you can do a better job, best to not rely on copying someone else’s drawings only if you can as easily work from life or a photo. (their errors will be multiplied by yours)
