Get to know them
Visit the online curriculum list to choose your own selection of learning modules, after you have covered this guide about brushes for painting, plus the other free chapters on art terminology and selecting acrylic paints.
A hair in the head is worth two in the brush
William Hazlett
Anatomy of a Brush
There are three parts to a paintbrush: the handle, the ferrule, and the head

All about brushes
Sizes & Shapes
Brushes for painting come in many different shapes and sizes. They generally use a numbering system from 000 up to 30 and beyond. Because there are variations in brands we tend to use mm or cm to describe the size of them or in the case of pointers, liners etc, fine and very fine. You'll soon know if you have the wrong brush for the job as it won’t easily do what you want. (assuming you have learned what each one is supposed to do!)
The most commonly used brush shape categories in both oil and acrylic painting are the rounds, flats, brights, filberts, and fan brushes. Decades ago, a round was the preferred brush shape because the consistency of traditional oil paints was much creamier than you'll find it today. Round brushes hold more paint in a fluid form, and they are also nice for making varied lines.
Nowadays,often the preferred shapes for acrylic painting are flat brushes. An artist uses a flat brush for softer, subtler brush strokes. The shorter and stiffer (bright) brush is good for making firm, clean strokes that leap into a painting with vigorous dashes of colour. A filbert is a bit like a flat brush except with rounded corners: it spreads colour in broader softer strokes, and its edge can be used for more precise brushwork.
A fan brush can be used for lightly blending paints that have already been applied adjacently. Fan brushes are also useful for glazing thin layers of transparent colour over more opaque, dried paint. (although I prefer a taklon varnish flat for this). Fan brushes are also invaluable for grass, foliage, hair and other things that require long parallel fine strokes or masses of short spiky strokes. (They can also be used on their points for implying foliage etc.)

The Characteristic Features of the Common Artists Brushes
A. Watercolour and Retouching Brushes, Mop shaped, round ferrules, short handlesbrush head "V" shaped

B. Oil/acrylic Painting Brushes – ROUNDS
These have round ferrules, long handles , brush head can be domed or flat . Can be used for stencilling and stippling as well as ‘daubing’ and scumbling

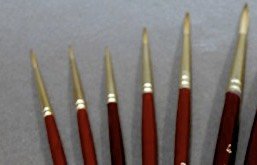
C. Rigger / Liner/Pointer
A rigger or liner brush (r) is a thin brush with extremely long hairs. These may come to a sharp point, have a flat or square tip, or be angled like a dagger. Because they can be loaded with a lot more liquid pigment than a pointer, rigger brushes are great for producing very long fine lines with a consistent width, making them ideal for painting thin branches on trees, boat mast/rigging, or cat's whiskers. They're also good for signing your name on a painting. (a liner is not quite as long as a rigger but still holds plenty of paint). A pointer (above left) is short and more easily controlled for very minute detail.

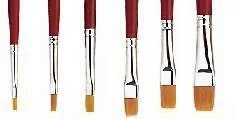
D. Oil /acrylic Painting Brushes -FLATS
Flats and Brights (shorter length hair section) have flat ferrules (get 5-6 sizes from 3mm- 50mm of stiff hog hair and also at least 5-6 sizes of soft synthetic hair)
(I recommend to students to wash all hog hair brushes before use as many loose hairs will come out then, also keep a small stiff brush handy to quickly hook out any hairs that may drop when you are first using them.)
SYNTHETIC FLATS
long handles , straight painting edge available in various lengths. Not for scumbling,( use hog hair for this aggressive technique. )

HOUSE BRUSHES- a lot of artists use larger house painting brushes for priming and also blocking in larger areas. The more $$ you spend on the brush usually, the less time you will spend picking out the hairs!! Maybe a better choice is a 'gesso brush', less likely to drop hairs.


LARGE FLAT SYNTHETIC HAIRED BRUSHES (eg. taklon)
These are excellent for varnishing and glazing large areas, even soft blending and feathering between colour or tonal variations in larger areas.

E. Filberts - flat ferrules, long handles, slightly rounded edges , available in various lengths ( in acrylics you can get by without them if you are on a tight budget and if you scumble a lot some of your hog hair flats will look like filberts eventually!!) Artists tend to use filberts more in oi painting than in acrylics

F. Fan Brushes- flat ferrules
open fan-shaped hairs
long handle: come as natural badger hair, hog hair or synthetic brushes (nice to have both small and also medium to large , get hog hair or badger hair if you can, the synthetic orange-haired ones are limited and less easily controlled. (some artists use the synthetic ones for feathering but I find large flat taklons more effective for this.)
Brush Care
The most important thing about brushes after how to use each one is how to treat them. Brushes that have not been used or cleaned properly will, among other things, lose the interlocking nature of their fibres. The individual hairs will stand apart and even break off at the edge of the ferrule. Follow these steps to avoid inadvertently ruining a useful brush:
* Don't use a brush alternately with watercolour and acrylic or even oil paints. The different media and cleaning procedures may add unnecessary stress to the fibres and negatively affect your results.
* Don't use natural fibre brushes with acrylic paints, as they will deteriorate over time. This is because of an alkali (ammonia) that is present in acrylics. Synthetic brushes are better for acrylics because their fibres are resistant to this chemical.
* Don't use fine soft hair brushes on rough surfaces. (use the hog hair ones)
* Always clean brushes immediately after use. Remove all paint from both the fibres and the ferrule.
* Never leave brushes resting/standing on their bristles or hairs. (major guilt trip for me!!)
* Never leave ferrules, bristles or hairs submerged or soaking in water (ditto). This can cause moisture to enter the handle and crack the wood. It may also deteriorate the fibres.
* Reshape (or "dress") the brushes after cleaning them (natural ones especially). Rest their head up in a pot or jar or rolled in a cloth making sure they are free from contact with any surface.
* If you're going to store brushes for a lengthy amount of time, make sure they are clean and dry. A moist brush can result in mildew, especially if it is covered. Also, keep moths and other insects away with a mothball or two if you leave them for a long period.
* If a synthetic brush should lose its shape, soak it in quite warm water for one to two minutes, then 'fashion' the brush into shape. (or keep it for those freaky jobs that no other brush wants to do!!)
* Never use heat (from a hair drier or a radiator) to dry your brushes. The hair can be damaged, and the brush head can come loose.
Cleaning Your Brushes
Watercolour Brushes - Rub the wet brush head on a normal bar of soap. Work up a lather, then rinse the brush under cool water. (Never use hot water to wash off paint; this may cause some paints to clump & harden in the hairs.) Repeat this until there is no trace of colour left in the lather. Be careful, however, before you use soap on a fine watercolour brush. Here it may help to think of your own hair care: some soaps may well damage the individual hairs by taking away natural oils. Never use a strong fat-removing soap or detergent when cleaning a brush.
Oils and Alkyds - Wipe off the oil colours thoroughly with a piece(s) of cloth, paper towel or newspaper. Use a small amount of solvent in a glass jar (a system of decanting and minimising the use and waste of solvents is explained in the module on oil paints). Afterwards, clean the hair or bristles with gentle soap (like velvet soap) and warm water until the soap produces a white lather. Again, avoid very strong soaps.
With acrylic paints it is essential that you rinse your brushes immediately after use, as the paint dries very quickly and will destroy the brushes' usefulness. Use cool water to avoid coagulation, and follow the same steps as with watercolour paints.
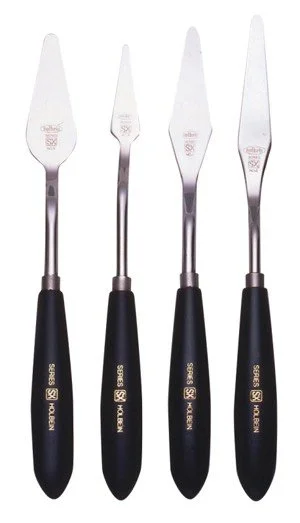
About Palette Knives
You can buy both metal and plastic palette knives. If you use paint in pots rather than tubes, these are handy for putting the paint on the palette and mixing and can be used for knife painting techniques and texturing.
I find the metallic palette knives much better for mixing paints, especially if you mix on a glass palette, as they leave almost nothing behind so you don’t lose pigment unnecessarily.
For knife painting, the plastic ones will do but break much more easily of course.